This guest blog entry was written by Melissa Guillen who is the Resident Principal with AppleTree Early Learning in Washington, DC. Melissa was previously a bilingual teacher at an elementary school within DCPS. She is originally from Peru and is passionate about bilingual education.
To my dear teachers- Para mis queridos maestros:
What does student engagement mean? Does it occur when students pay attention? Does it mean students are on task? In my third year of teaching I was fortunate to have differentiated Professional Development; this meant, I could choose an area of focus based on my needs and prior knowledge.
Our school hired a Technology Instructional Coach that year, and although we had been provided SMART Boards the year before, to most us, the interactive white boards, microphones & iPads looked like foreign objects that we could use, but not to their maximum potential.
I chose Technology Instructional Coaching because being a teacher at a Title 1 school in an urban setting, I saw the remarkable differences on how wealthier children interacted with technology in meaningful ways throughout their educational days and our students had begun to think of technology as solely a tool for play. I wanted to provide the same opportunities for meaningful interactions with technology to my students, I had the tools, it was my duty to put them to action to achieve Educational Equity.
I had slowly self-taught myself how to use the smartboard, but I had not taught my students how to meaningfully interact with this amazing tool to own their learning. During my instructional technology coaching I learned how to use the Smartboard as an independent student-led center for both language arts and math (in English and Spanish) and then the magic started happening.
Many questions raced through my head: How do I keep the students from fighting about who gets to solve a problem first? How can they self-correct their work? Will they be able to get unstuck if they get stuck or will I be hearing multiple requests for help as I do guided reading? There is a big difference between using a smartboard for play and using it in a well-structure manner to grow in your learning. This is something that needs to be explicitly taught to students.
STEPS TO SUCCESS:
Using removable hanging hooks and turn taking cards solved the issue of who would go first, a list took care of ensuring each player had a fair turn.
The team captain passes out a dry erase marker and a dry erase board to each team member to make sure they perform the smartboard exercise along with the person doing the exercise in the smartboard.
Students put their boards up when they are done, this serves a dual purpose: The smartboard student is able to check his/her work using the dry erase boards of their team members while also ensuring that their team members have performed the exercise correctly, bam!
My concerns were put at ease with these systems implemented and I witnessed meaningful student engagement. Our Smartboard was not meant for playing without purpose, technology helped us learn, this is what empowered educated adults know and this is what every student deserves to experience regardless of his or her zip code.
We even had a local high school create stools so that the students could reach the smartboard with more ease. Now I know, that this is what high student engagement looks and feels like, let the magic begin!
This guest blog entry was written by Melissa Guillen who is the Resident Principal with AppleTree Early Learning in Washington, DC. Melissa was previously a bilingual teacher at an elementary school within DCPS. She is originally from Peru and is passionate about bilingual education.
So you have a new interactive whiteboard? What do you do now?
Interactive Whiteboards can be very powerful classroom tools or can end up being a glorified projector - or worse - a place to hang posters. However, if an educator seeks to use the tool as a way to engage students by letting them use the tool - this will go a long way. Don't feel that you have to know everything about the board before you let students use it. Setting up your class to use the board as a digital center or brainstorm space is a great way to get your students up and using the board.
Here is a resource to get you started by thinking of differing ways to get your class using the board, rather than just yourself.
This allows students to respond with devices (laptops, iPads) to a teacher prompted. Responses are displayed onto the SMART Notebook page for viewing and manipulating.
HDMI/VGA - picture (toggle to the correct source to display picture)
USB - pen tray (must be solid green for tray to be fully functioning)
Sound - headphone jack (HDMI will play sound-use headphone cord for surround sound)
Microphone (channel A or B, adjust sound on sound panel)
DVD Player (source - composite)
Orient
Notice that the cursor/pen seems to not be aligned where you are touching? You may need to "orient" your board. This can happen if the board is new, gets bumped or you are plugging into a different board. Click the crosshairs button on the pen tray and follow the on screen directions.
Components
SMART Notebook
SMART Notebook is the software designed to create lessons for SMART. Think of this as the program's software. You can create lessons with multiple pages and activites. Think of this as SMART's version of Powerpoint. You have the most control over colors and interactive features within this program itself. You can create files, save, alter and rename just like other products you might be comfortable with like Microsoft. The free version of this software is SMART Notebook 11.4, so feel free to download onto your home computer if you are interested.
Floating Tools
Floating tools and SMART Ink were created to give the user easy access to SMART tools even outside of Notebook itself. Rememer overhead projectors? A teacher could write on top of a transparency film by layering another piece of transparency. This is exactly what Floating Tools and Smart Ink is designed to do, think digital ink layer.
Interested in annotating on top of a video, webpage or PDF? You can do this with Floating Tools and SMART Ink. The Floating Tools are designed to allow you to customize tools you want to use the most. Click on the gear icon and customize all you'd like. Remember this tool works when you are connected to a board. Don't want to lose your annotations, be sure to take a screenshot to be saved to a Notebook file.
SMART Ink
SMART Ink was developed to give users easy access to the tools they used most often. Again this can only be used when the board is plugged into the computer. When working outside of Notebook itself, as SMART Ink icon will pop-up in every new window you open.
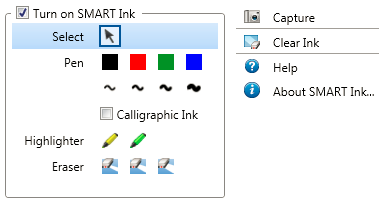
From here clicking on the down arrow allows you to manipulate some of the most frequently used items (pens, highligher, eraser and camera tool).
Having trouble remember what tool you have selected? SMART Ink will inform you with an active item pop-out tab. If you aren't seeing a tab, note this means the SMART Ink tool is on the default clicker/cursor.
Don't forget to save - Camera Tool
Need to save anything you did with Floating Tools or SMART Ink? Don't forget to use the camera tool and it will place the screenshot in Notebook for you!
It is hard to start planning a lesson from scratch. If you are looking for motivation or ideas for an integrated lesson you may want to check out the SMART Exchange website. Here you can search and sort by grade level, file type and subject to view SMART Notebook files created and uploaded by other teachers. You can download files and make them your own. It can be very helpful to piece together best Smart Notebook files that you find and ones you create for the perfect integrated lesson. Of course if you have created any rockstar SMART Notebook files upload and share with the SMART community. Happy creating!